United States
Canada
- Europe
Netherlands
Germany
- Africa
- Rest of World
This article will cover the Gorman-Rupp family of grease seals - its history, design, function, application, installation procedure and proper maintenance.
History
The Gorman-Rupp grease seal was designed in the early 1930s by co-founder H.E. Rupp for use in contractor's type pumps on dirty water applications. It has been so successful that the design is currently manufactured in six standard sizes ranging from 5/8 to 1 3/4. Most of these sizes are manufactured in three different material of construction. Some years ago, Gorman-Rupp attempted to make a better grease seal to replace the current version. An untold number of exhaustive hours of research and testing were completed. In the end, the conclusion was that we could not improve upon the best seal in the industry for its intended use.
Design
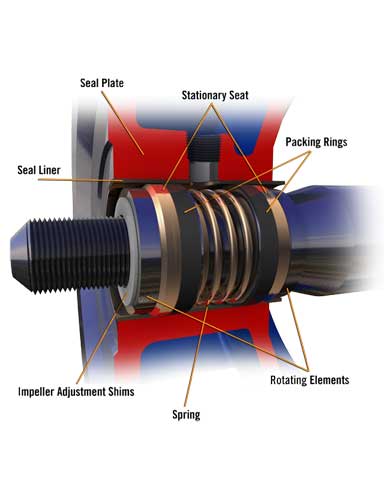
The design of the grease seal has remained virtually unchanged since its inception in the early 1930s. All of the grease seal sizes are double, grease-lubricated, mechanical seals. The double seal design relates to its back to back configuration. The seal consists of hardened steel rotating faces, sintered bronze stationary faces, neoprene packing rings, steel springs and washers, a steel spacer sleeve, and stainless steel impeller shims. These components are ultimately installed into a brass or stainless steel seal liner pressed into the pump's seal plate.
Function
The seal has two functions. The seal keeps water in the pump and air out. This is achieved due to the flatness of the seal's stationary and rotating seal faces. These two sets of faces run together in the presence of lubricating grease. The grease lubrication is provided by a spring-loaded grease cup.
Application
The Gorman-Rupp grease seal can be applied to any liquid compatible with the materials of construction of the sealing components at the wetted end of the seal. The grease seal CANNOT be used on petroleum applications. With this said, there are two limiting factors to keep in mind. The first is temperature. Temperature of the product pumped must not exceed 110 degrees Fahrenheit (43 degrees Celsius). The second is inlet pressure. The incoming pressure or flooded suction must not exceed 10 P.S.I. If the inlet pressure exceeds 10 P.S.I., the seal will collapse. Of course, on lift applications, the inlet side of the pump is under a vacuum condition.
Installation
The pump will inform you when the seal has failed. Watch for the following signs:
Once you have determined you need to replace the seal, review the installation, operation, parts list, and maintenance manual for your pump model. Review the parts list and cross section drawing carefully to determine the additional parts you may require. The grease seal is supplied with an installation instruction sheet as well. Don't forget gaskets and a new seal liner. After the pump is disassembled and the parts cleaned, inspect the seal liner for any grooves caused by the seal's failure. If the seal liner is grooved, it must be replaced. A new seal liner may be used to press the damaged seal liner from the seal plate. After installing the new seal liner into the seal plate, drill and deburr a hole through the seal liner at the grease cup port to allow for grease flow from the grease cup. Lay the seal plate on a flat surface and press one of the bronze faces, one of the neoprene packing rings, and backing washer facing outward into the seal liner. The packing rings may be lubricated to facilitate the ease of installation. They may be lubricated very sparingly with a light oil. NEVER USE A SUPER LUBRICANT SUCH AS NEVER-SEIZE, STP, SILICONE, ETC. If lubricated excessively, the packing rings may fall from the liner or spin during operation of the pump. Turn the seal plate over and insert the spring. Assemble the opposite end of the seal by installing the backing washer and the stationary seal face with packing ring. Pack the area between the stationary faces with No. 2 lithium-based grease.
Prior to further assembly, determine by the manual the need for your model to include the additional spacer washer. If required, install the washer on the impeller shaft with the inside diameter chamfer facing the shaft shoulder and inboard bearing. Ensure that all seal faces are clean. Install one of the hardened steel rotating faces onto the impeller shaft and against the required steel spacer or against the shaft shoulder, whichever applies. Ensure that the inside diameter chamfer of the steel washer faces the shaft shoulder. Install the seal plate over the impeller shaft and secure it to the bearing pedestal. Install the second hardened steel rotating face onto the impeller shaft with the inside diameter chamfer facing the impeller. Add the appropriate amount of shims to obtain the proper seal plate to impeller clearance per the manual. Proceed with the reassembly of the pump. Remove all the old grease from the grease cup and lubrication piping. Install the grease cup and piping into the seal plate. Fill per the following Maintenance section below.
Maintenance
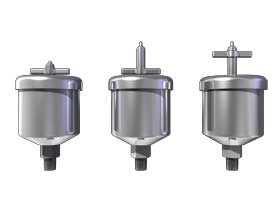
The only routine maintenance required on the Gorman-Rupp grease seal is to fill the spring loaded grease cup when required. When the grease cup is empty (see figure above) turn the cross arm to the bottom of the plunger rod. Remove the grease cup cap by turning it counterclockwise. Fill the grease cup by hand. DO NOT PRESSUREIZE THE GREASE CUP. Doing so may lubricate stationary parts in the seal causing them to spin and the seal to fail prematurely. After filling the grease cup, replace the cap of the grease cup. Turn the cross arm to the top of the plunger rod. This causes the spring to apply pressure to the grease, forcing the grease into the seal assembly.
It is not uncommon for a new grease seal to drip when using traditional grease prior to the seal faces seating. Remember, this seal uses grease while in use. The grease in the cup may require filling daily when used continuously.
Original Equipment
In the recent past, Gorman-Rupp has learned of companies manufacturing aftermarket repair parts at considerably reduced prices. Gorman-Rupp, unfortunately, learned of these companies after several customers purchased seals from companies alleging the seal was interchangeable when it was not. The difference between the original seal and the copies are subtle but different enough to affect the performance and expected life. This, in turn, costs the customer additional time, money, and frustration. Therefore, always use original equipment repair parts. We invented, designed, developed, and tested the Gorman-Rupp grease seal. Remember, we attempted to improve upon its original configuration only to learn the original was the best grease seal on the market. So don't use anything less than the best. Keep your Gorman-Rupp pump in good working order with original parts from Gorman-Rupp.

